Wednesday, 8 October 2014

ServletContext vs ServletConfig

SerlvetConfig-
ServletConfig is a interface which is implemented by GenericServlet, and this Servlet or HttpServlet (sub class of GenericServlet) can be used to create your own Servlet class. Single servlet configuration passed by Servlet container to init() method to initialize some parameter on Servlet.

These parameter is defined in descriptor file (web.xml).<init-param> tag will be used under <servlet> tag.This Config object is public to a servlet and scope will be, as long as a servlet is executing, ServletConfig object will be available, it will be destroyed once the servlet execution is completed.

For example-

Web.xml file-

<servlet>
 <servlet-name>servlet-config</servlet-name>
 <servlet-class>com.test.MyServlet</servlet-class>
 <init-param>
  <param-name>name</param-name>
  <param-value>XXXXXX</param-value>
 </init-param>
</servlet>

MyServlet.java file- 

public void init(ServletConfig config) throws ServletException
{
    ServletContext sc = getServletContext();
    getServletContext().getInitParameter("name"); 
}

Now the question is when is difference between int() method and int(ServletConfig) method.

public void init(ServletConfig config)throws ServletException
This method Called by the servlet container to indicate to a servlet that the servlet is being placed into service.See Servlet#init. This implementation stores the ServletConfig object it receives from the servlet container for later use. When overriding this form of the method, call super.init(config).

public void init() throws ServletException
A convenience method which can be overridden so that there's no need to call super.init(config).Instead of overriding init(ServletConfig), simply override this method and it will be called by GenericServlet.init(ServletConfig config). The ServletConfig object can still be retrieved via getServletConfig().

ServletContext-
ServletContext is implemented by the servlet container for all servlet to communicate with its servlet container.This object is contained within the ServletConfig object. And to access the ServletContext  use ServletConfig object within a servlet. This again is specified in descriptor file (web.xml) under <context-param> tags, as this is not specific to specific servlet so, present globally i.e. outside of <servlet> tag.Mainly This is used to access common information among servlet, which is store in <context-param> tag.

ServletContext object is global to entire web application. Object of ServletContext will be created at the time of web application deployment.And scope will be, as long as web application is executing, ServletContext object will be available, and it will be destroyed once the application is removed from the server.ServletContext object will be available even before giving the first request.

For examplet-
Web.xml file

<context-param>
    <param-name>globalVariable</param-name>
    <param-value>Hello To all servlet</param-value>
</context-param> 

MyServlet.java file

public void doGet(HttpServletRequest request, HttpServletResponse response)
 throws IOException{
  PrintWriter pw = response.getWriter();
        pw.println(getServletContext().getInitParameter("globalVariable"));
}

Sunday, 5 October 2014

HttpSession, Session in java

In previous chapter I have explained various ways of session tracking (cookie, hidden form field, url rewriting). In this chapter I will explain one more way of session tracking which is HttpSession.

Sessions are server-side files that contain user information, while Cookies are client-side files that contain user information. Sessions have a unique identifier that maps them to specific users. This identifier can be passed in the URL or saved into a session cookie.

Create the session
 
The HttpServletRequest interface provides two methods to get the object of HttpSession (javax.servlet.http.HttpSession)-
  1. public HttpSession getSession():Returns the current session associated with this request, or if the request does not have a session, creates one.
  2. public HttpSession getSession(boolean create):Returns the current HttpSession associated with this request or, if there is no current session and create is true, returns a new session.
For example-

protected void doPost(HttpServletRequest request,
    HttpServletResponse response)
    
    throws ServletException, IOException {

    HttpSession session = request.getSession();

}

 But apart from these methods, some method are also commonly use-
  1. public String getId():Returns a string containing the unique identifier value.
  2. public long getCreationTime():Returns the time when this session was created, measured in milliseconds since midnight January 1, 1970 GMT.
  3. public long getLastAccessedTime():Returns the last time the client sent a request associated with this session, as the number of milliseconds since midnight January 1, 1970 GMT.
  4. public void invalidate():Invalidates this session then unbinds any objects bound to it.

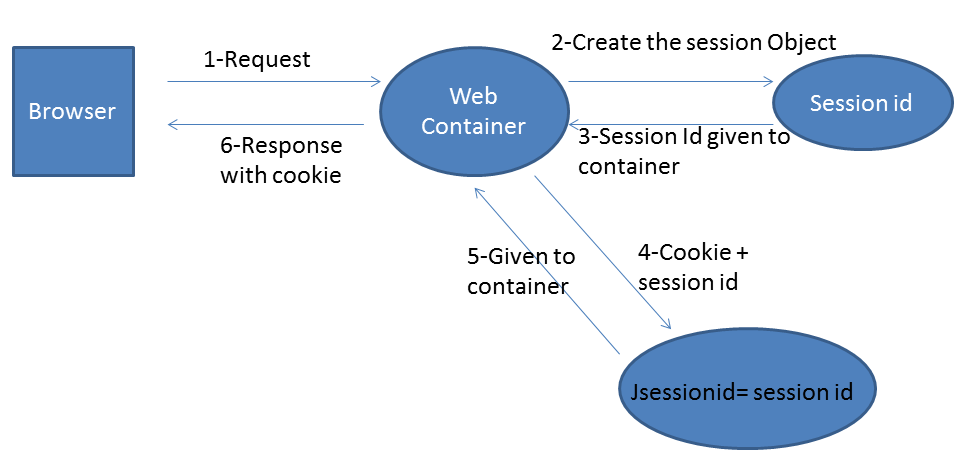
Let's try to understand what happen, when create the session by below diagram-


Above diagram shows that when session object with unique id created by container, This sessions identifier that maps them to specific users. This identifier can be passed in the URL or saved into a session cookie. And later consecutive browser request will include this identifier with it and send to container to identify correct user specific session object.

Store the value/attribute inside Session
To store the value inside session object we can use setAttribute() method. It has two parameter first is for key and second is for value.Session internally uses map to store the value. Hence takes key/value pare from parameter.
  
session.setAttribute("key", "value");
e.g. 
session.setAttribute("userName", "XXXX");


Retrieve the value/attribute from session
To retrieve the value from session we can use getAttribute method()
e.g.
String userName = (String) session.getAttribute("userName");

Delete the session

To delete the session use invalidate() method-

e.g

// Get the existing session.
HttpSession session = request.getSession(false);

// Invalidate the existing session, to
ensure that all previous session data(s) for the user is removed //from the context.
if(session!=null) {
    session.invalidate();
}


But sometime when user login to the application after Session Times out,we may not
need his previous session data and we need to create a new session for the user.


// Get the existing session.
HttpSession session = request.getSession(false);

if(session!=null) {
session.invalidate();
}
// Create a new session for the user.
session = request.getSession(true);

We can also use setMaxInactiveInterval(int interval) method to set the minimum time to session will be kept alive by the server when it doesn't get accessed by a client. if you use this method then explicitly no need to call invalidate() method.
By default time session timeout for tomcat is 30min

We can also configure this timeout value in descriptor file -

<session-config>
    <session-timeout>10</session-timeout>
</session-config> 

Let's take example of session-

public void doGet(HttpServletRequest request, HttpServletResponse response)
throws ServletException, IOException {
response.setContentType("text/html");
PrintWriter out = response.getWriter();


// getting current HttpSession associated with this request or, if there
// is no current session and create is true, returns a new session.
HttpSession session = request.getSession(true);

out.println("Session ID: " + session.getId() );
out.println("Is it a new session: " + session.isNew());
out.println("Session Creation time: " + session.getCreationTime());
out.println(new Date(session.getCreationTime()));
out.println("Last accessed time: " + session.getLastAccessedTime());
out.println(new Date(session.getLastAccessedTime()));
out.println("Max in active time interval: " + session.getMaxInactiveInterval());


// Checks whether the requested session ID came in as a cookie
out.println("Session ID came in as a cookie: "+ request.isRequestedSessionIdFromCookie());

   Enumeration names = session.getAttributeNames();
   while (names.hasMoreElements()) {
      String name = (String) names.nextElement();
      String value = session.getAttribute(name).toString();
      out.println(name + " = " + value );
   }

}

Friday, 3 October 2014

URL Rewriting

I explained in previous chapter if browser has disabled the cookie then use hidden form field for session tracking. But in hidden form field user easily can identified by seeing URL that what are all the information transmitting in query string-
e.g.
http://serverhost:port/applicationname/servlet.do?username=xxx&age=xx&..................

So, we can say end user easily can stole the information and hack the data if http request method is GET.

But Java provides another way of session tracking URL Rewriting. In this mechanism requested URL will be modified by adding some extra information. Extra information is nothing but placing a session id in the URL called jsessionid.

The question comes in mind what is JSESSIONID and why it is necessary?
The answerw will be- If Web server is using cookie for session management/tracking it creates and sends JSESSIONID cookie in the response to the client and then client sends it back to server in subsequent http requests. So, we can say this is a one identifier to identify the cookie, If  client has disabled cookie then Container uses URL rewriting for managing session on which jsessionid is appended into URL as shown below-
e.g.
http://serverhost:port/applicationname/servlet.do;jsessionid=363F3D316

Let's create example to understand URL rewriting. In this example doGet() method of servlet encoding the url and then writing to the out stream.


protected void doGet(HttpServletRequest request,
   HttpServletResponse response) throws ServletException, IOException {
    response.setContentType("text/html");
    java.io.PrintWriter out = response.getWriter();
    String contextPath = request.getContextPath();
    String encodedUrl = response.encodeURL(contextPath +  
         "/WelcomePage.jsp");

    out.println("<html>");
    out.println("<head>");
    out.println("<title>URL Rewriter</title>");
    out.println("</head>");
    out.println("<body><center>");
    out.println("<h2>URL rewriting Example</h2>");
    out.println("For welcome page - <a href=\"" + encodedUrl+ "\">
        Click Here</a>.");
    out.println("</center></body>");
    out.println("</html>");
}

WelcomePage.jsp page

<html>
<body>
<h2 align="center">Welcome to URL rewriting example</h2>
</body>
</html>

But make sure URL rewriting has significant security risks. Session id appears in the URL, it may be easily seen by third parties and end user can-
  • end users often copy and paste such links without knowing the attached session id compromises their security
  • server log files usually record the 'Referer' header, which will record session ids in the log
Third-party access to session id's simply means that private user information is wide open to attack. Thus, many argue that URL rewriting is a dangerous practice, and should be avoided. If cookies are used instead, then the session id does not appear in the URL.

It's possible that some web sites may use cookies to track user browsing patterns. As a result, some users turn off cookies in an attempt to protect their privacy. However, given the seriousness of the above security issue, many would argue that turning off cookies is actually much worse for user privacy. That is, the risk of compromising personal data through session hijacking seems to far outweigh concerns about tracking personal browsing patterns.

Next chapter I will explain about session. click here to go to next chapter

Wednesday, 1 October 2014

Hidden Form Field

As I explain in previous chapter that cookie has drawback that if browser has disabled cookie then cookie will not work. So, work around of previous approach is hidden form field.

In this approach we use hidden form field to store user states so that this user states can be circulated among servlets.

<input type="hidden" name="Language" value="English">

e.g
Login page where user will submit username and password and this username will be stored in hidden field of another page and it will be showed in top of home page.

1. Create  the login page-

<form action="loginaction"> 
    Name:<input type="text" name="userName"/><br/> 
    Password:<input type="password" name="password"/><br/> 
   <input type="submit" value="submit"/> 
 </form> 

2. Create the servlet which will handle login action-
  1. import java.io.*;  
  2. import javax.servlet.*;  
  3. import javax.servlet.http.*;  
  4.   
  5. public class LoginServlet extends HttpServlet {  
  6. public void doGet(HttpServletRequest request, HttpServletResponse response){  
  7.         try{  
  8.         String userName= request.getParameter("userName");
  9.         String password = request.getParameter("password");  
  10.         if( userName!= null &&password != null && isAuthUser(userName,password )){
  11.             response.setContentType("text/html");  
  12.             PrintWriter out = response.getWriter();  
  13.             out.print("Welcome "+userName);  
  14.             out.print("<form action='homeServlet'>");  
  15.             out.print("<input type='hidden' name='username' value='"+userName+"'>");  
  16.             out.print("<input type='submit' value='home page'>");  
  17.             out.print("</form>");  
  18.             out.close(); 
  19.         }
  20.        }catch(Exception e){System.out.println(e);}  
  21.     }  
  22.   
  23. } 
3. Create the HomeServlet which will generate page by using hidden field value. 
  1. import java.io.*;  
  2. import javax.servlet.*;  
  3. import javax.servlet.http.*;  
  4.   
  5. public class HomeServlet extends HttpServlet {  
  6. public void doGet(HttpServletRequest request, HttpServletResponse response){  
  7.         try{  
  8.         String userName= request.getParameter("username");      
  9.         if( userName!= null ){
  10.             response.setContentType("text/html");  
  11.             PrintWriter out = response.getWriter();  
  12.             out.print("User: "+userName);  
  13.            //other home page creation logic
  14.             out.close(); 
  15.         }
  16.        }catch(Exception e){System.out.println(e);}  
  17.     }  
  18.   
  19. }

4. Create the web.xml file and put servlet mapping. 

  1. <web-app>  
  2.   
  3. <servlet>  
  4. <servlet-name>login-servlet</servlet-name>  
  5. <servlet-class>LoginServlet</servlet-class>  
  6. </servlet>  
  7.   
  8. <servlet-mapping>  
  9. <servlet-name>login-servlet</servlet-name>  
  10. <url-pattern>/loginaction</url-pattern>  
  11. </servlet-mapping>  
  12.   
  13. <servlet>  
  14. <servlet-name>home-servlet</servlet-name>  
  15. <servlet-class>HomeServlet</servlet-class>  
  16. </servlet>  
  17.   
  18. <servlet-mapping>  
  19. <servlet-name>home-servlet</servlet-name>  
  20. <url-pattern>/homeServlet</url-pattern>  
  21. </servlet-mapping>  
  22.   
  23. </web-app> 

In above example you can see username which is entered in login page and validated in LoginServlet later it stored in hidden input box and this value is used in HomeServlet. So, you can see username is shared among two servlet.

Saturday, 27 September 2014

Cookies

As you know Http is stateless protocol. So, each time when any user request in web application, it will be new request. Hence we can not identify the user that user is already accessed the web resource or not.To avoid this web application has provided cookie mechanism to identify the user states.

Cookie is nothing but small filesystem in client browser, that can store some information. Cookie can be of two types-
  • Session cookies – Session cookies are stored in memory and are accessible as long as the user is using the web application. Session cookies are lost when the user exits the web application. Such cookies are identified by a session ID and are most commonly used to store details of a shopping cart.
  • Permanent cookies – Permanent cookies are used to store long-term information such as user preferences and user identification information. Permanent cookies are stored in persistent storage and are not lost when the user exits the application. Permanent cookies are lost when they expire.
Cookie is good option to store minimal value around 4k bytes of data to the client browser. Data always should be textual format. And cookie will not work if cookie option is disabled from the browser.


Creating the Cookie
 javax.servlet.http.Cookie class provide the functionality to create the cookie.

Cookie cookie = new Cookie("cookie-name" , "cookie-value")

You know now how to create the cookie but as earlier explain cookie stored inside client browser, so  response object help us to send cookie to the client browser by addCookie() method.

response.addCookie(cookie)

Reading Cookie
Whenever client sends new request, it submit cookie also. So cookie read by getCookies() method of request object.

Cookie[] cookies = request.getCookies();

for(Cookie cookie : cookies){
    if("cookie-name".equals(cookie.getName())){
        System.out.println(cookie.getValue());
    }
}

Removing Cookies
Removing the cookie is control by setMaxAge() method. This method takes int value from parameter expiry in second, if the passed parameter value is 0 then cookie will be removed immediately. And if passed parameter is -1 then cookie will be live until browser shutdown.

Cookie cookie = new Cookie("cookie-name" , "cookie-value");
cookie.setMaxAge(0);
response.addCookie(cookie);
 
Next chapter I will explain the next way of session tracking- next chapter 

Saturday, 20 September 2014

Session Tracking

Session Tracking
Http is stateless protocol, this means that one request and response for this request is one cycle. These cycles are not dependent to each other. Hence each cycle's states are independent. But sometime during development we get scenario where maintaining state is required. e.g. Login module of application need to know which user is loggedin so, here user state is require to maintained

So, To recognize the user It is used to recognize the particular user.

In servlet there are four techniques used in Session tracking:
  1. Cookies
  2. Hidden Form Field
  3. URL Rewriting
  4. HttpSession

GenericServlet vs HttpServlet

You have seen in servlet tutorial here, I have given idea about Servlet APIs, Servlet interface implemented by GenericServlet Class and GenericServlet class extended by HttpServlet. So, why HttpServlet if GenericServlet? What is the advantage you will achieve by HttpServlet?
Let us know about more about GenericServlet and HttpServlet-

GenericServlet- This is Generic class and used to create protocol independent Servlet. When you create servlet class, need to ovverride service() method. service() method has two parameter ServletRequest and ServletResponse. These parameter is also Generic and used to pass protocol independent parameter. This means it can handle any type of request e.g. http, ftp, smtp.

Example is given in previous chapter, to go click here,

HttpServlet- This class is extended from GenericServlet. This is specific to Http protocol which used to create http protocol dependent Servlet. When you create servlet class, you have choices to ovverride either service(), doGet() or doPost()  method. doGet() and doPost() method has two parameter HttpServletRequest and HttpServletResponse. These parameter is specific to http and used to pass http protocol dependent parameter. This servlet class is introduced to make life easier, so that developer no need to worry about http protocol things separately.

E.g.

package example; 
import java.io.*;

import javax.servlet.http.*;
import javax.servlet.*;

public class MyServlet extends HttpServlet{ 
 
 //this will handle http get
  public void doGet(HttpServletRequest req,HttpServletResponse res)
    throws ServletException, IOException
  {
    PrintWriter out = res.getWriter();

    out.println("Basic http servlet example");
    out.close();
  }
 
//this will handle http post 
  public void doPost(HttpServletRequest req,HttpServletResponse res)
    throws ServletException, IOException
  {
   doGet(req,res);
  } 
}
 
 
To go next chapter click here